I've been featured this week on Femke's "What I wanna know Wednesday" spot on her blog, Deligted. If you want to read what I had to say, you can read it here.

Friday, 15 February 2013

Thursday, 14 February 2013
Midori Traveler's Notebook DIY inserts - finishing touches
I'm a big fan of making my own inserts for the Midori Traveler's Notebook. Recently I offered for download pages you could use to make your own lined or grid inserts.
I've introduced two finishing touches to my own inserts, as you can see in the picture:

Firstly, I've used a white, grain-textured report cover as my insert cover, which gives the insert a rather exclusive and refined look. Secondly, there is the title box. It looks like a rubber stamp, but it isn't. It's printed.
You can download my title page sheet if you like. There are two versions. one for a lined paper insert, the other for a grid paper insert. When you print your lined or grid paper pages, just add one of these title pages to the top of the stack and then stitch to bind in the usual way.
Here are the templates:
Lined pages title sheet: Word file PDF file
Grid pages title sheet: Word file PDF file
I've introduced two finishing touches to my own inserts, as you can see in the picture:

Firstly, I've used a white, grain-textured report cover as my insert cover, which gives the insert a rather exclusive and refined look. Secondly, there is the title box. It looks like a rubber stamp, but it isn't. It's printed.
You can download my title page sheet if you like. There are two versions. one for a lined paper insert, the other for a grid paper insert. When you print your lined or grid paper pages, just add one of these title pages to the top of the stack and then stitch to bind in the usual way.
Here are the templates:
Lined pages title sheet: Word file PDF file
Grid pages title sheet: Word file PDF file
Wednesday, 13 February 2013
Filofax minimalist page per day diary - now in Personal and Pocket to download
When Steve and I published the minimalist A5 diary, more than one person asked for Personal or Pocket versions. We are making both available today.
As in the A5 version, there are no time slots and no visual clutter, just a clear date block and light, ruled lines.
It would be ideal as a diary, but might work well alongside - say - a week to view being used as an appointments diary, where this new layout is used to record notes or to log date-specific information.
You can download this layout as a prepared set or you can download the source files to adapt the design for yourself.
Pre-prepared sets
You can download the 2013 Personal set as a Word file or as a PDF file.
You can download the 2013 Pocket set as a Word file or as a PDF file.
Print these double-sided. If you have a duplex printer, set it to flip on the short edge. If you don't then you'll have to print odd-numbered pages and then refeed to print the even-numbered pages on the reverse. You might have to experiment to find out how to refeed the paper.
On one side of each sheet you'll find crop marks. Use a craft knife and a steel ruler to release the Personal or Pocket pages and punch them. The templates are set up with mirrored gutters to accommodate the holes.
If using the PDF be sure to set it to print at full size as explained here.
Source files
You can also roll your own using our source files. For Personal size, you'll need this Word file and this Excel file. For Pocket size, you'll need this Word file instead (the same Excel file drives both Personal and Pocket versions.)
If you want to know how to go about using the source files, this post will help you. If you look at the 'Free Diary Pages' link in the navigation bar above, you'll find some videos which explain the mail merge process for different generations of the Office application, too.
 |
| Pocket version - click to enlarge |
As in the A5 version, there are no time slots and no visual clutter, just a clear date block and light, ruled lines.
It would be ideal as a diary, but might work well alongside - say - a week to view being used as an appointments diary, where this new layout is used to record notes or to log date-specific information.
You can download this layout as a prepared set or you can download the source files to adapt the design for yourself.
Pre-prepared sets
You can download the 2013 Personal set as a Word file or as a PDF file.
You can download the 2013 Pocket set as a Word file or as a PDF file.
Print these double-sided. If you have a duplex printer, set it to flip on the short edge. If you don't then you'll have to print odd-numbered pages and then refeed to print the even-numbered pages on the reverse. You might have to experiment to find out how to refeed the paper.
On one side of each sheet you'll find crop marks. Use a craft knife and a steel ruler to release the Personal or Pocket pages and punch them. The templates are set up with mirrored gutters to accommodate the holes.
If using the PDF be sure to set it to print at full size as explained here.
Source files
You can also roll your own using our source files. For Personal size, you'll need this Word file and this Excel file. For Pocket size, you'll need this Word file instead (the same Excel file drives both Personal and Pocket versions.)
If you want to know how to go about using the source files, this post will help you. If you look at the 'Free Diary Pages' link in the navigation bar above, you'll find some videos which explain the mail merge process for different generations of the Office application, too.
Saturday, 9 February 2013
Make a flexible today marker and note holder for your Filofax
It's DIY time again. This is part today marker, part note holder for important messages you want to see every day.

The marker acts as a sleeve for a piece of paper or card which you have cut to size. One usage suggestion is shown below, but you could also use this to carry your reading or shopping list, or if you're abroad a few important phrases in the local language perhaps.

And you don't need to choose just one use, either. Because it is transparent, you can have a different note facing the other way.
The paper note is easy replaceable, thanks to the crafty shaping of the back piece, behind the 'Today' tab:

The piece of card that runs the full height of the marker is used to glue the open cut sides together and to strengthen the edge that will be stressed when you remove it from and replace it on the rings. After punching, use scissors to cut slots from each hole to the edge. This means you can move it easily from week to week without having to open the rings.

So, how is it made? Well, if you've studied the pictures, you should already have a pretty good idea, but I'll run through the steps.
You should start with a clear polypropylene file folder, one of these, for instance:
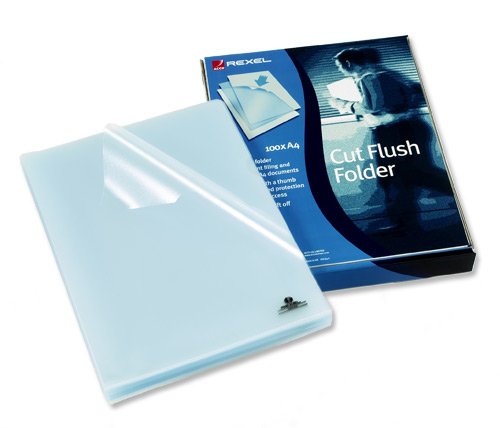
These are closed on the bottom and left, open at the top and right. Choose one that's fairly thick and robust.
Your starting point is to use a Filofax page as a rough guide to cut out the part you want. It's the bottom, left-hand corner of the folder where the joined sides meet. The piece you cut out should be about 0.5 - 1.5 cm taller than a Filofax page (depending whether you want it to protrude at the bottom as well as at the top.) The width is a matter of personal choice. Mine is about 60% of the width of a Filofax page.
Next you'll need the strip of card for the side. This should be the full height of the piece and 1.5 cm wide. Glue it on both sides and place between the two open long edges. Leave it to dry and trim at the top if necessary.
Next you can punch the holes. Because you're punching plastic, this isn't as straightforward as paper because the plastic will resist the cut and try to stretch instead. Having the card helps, but I've found a single hole punch works better than the 6-hole ones. Use a Filofax page as a guide for where to punch and cut the slots with scissors.
Now you can shape the top tab with a craft knife, before turning the piece over to shape the reverse. This is the hardest bit, because you want to cut through only one layer of plastic, not both of them. I did it by first cutting a few pieces of scrap card to fit together between the layers. Then, I used a craft knife and cut the shape freehand. The blade bit into the card underneath, but didn't penetrate to the plastic behind.
So, how will you use yours?

The marker acts as a sleeve for a piece of paper or card which you have cut to size. One usage suggestion is shown below, but you could also use this to carry your reading or shopping list, or if you're abroad a few important phrases in the local language perhaps.

And you don't need to choose just one use, either. Because it is transparent, you can have a different note facing the other way.
The paper note is easy replaceable, thanks to the crafty shaping of the back piece, behind the 'Today' tab:

The piece of card that runs the full height of the marker is used to glue the open cut sides together and to strengthen the edge that will be stressed when you remove it from and replace it on the rings. After punching, use scissors to cut slots from each hole to the edge. This means you can move it easily from week to week without having to open the rings.

So, how is it made? Well, if you've studied the pictures, you should already have a pretty good idea, but I'll run through the steps.
You should start with a clear polypropylene file folder, one of these, for instance:
These are closed on the bottom and left, open at the top and right. Choose one that's fairly thick and robust.
Your starting point is to use a Filofax page as a rough guide to cut out the part you want. It's the bottom, left-hand corner of the folder where the joined sides meet. The piece you cut out should be about 0.5 - 1.5 cm taller than a Filofax page (depending whether you want it to protrude at the bottom as well as at the top.) The width is a matter of personal choice. Mine is about 60% of the width of a Filofax page.
Next you'll need the strip of card for the side. This should be the full height of the piece and 1.5 cm wide. Glue it on both sides and place between the two open long edges. Leave it to dry and trim at the top if necessary.
Next you can punch the holes. Because you're punching plastic, this isn't as straightforward as paper because the plastic will resist the cut and try to stretch instead. Having the card helps, but I've found a single hole punch works better than the 6-hole ones. Use a Filofax page as a guide for where to punch and cut the slots with scissors.
Now you can shape the top tab with a craft knife, before turning the piece over to shape the reverse. This is the hardest bit, because you want to cut through only one layer of plastic, not both of them. I did it by first cutting a few pieces of scrap card to fit together between the layers. Then, I used a craft knife and cut the shape freehand. The blade bit into the card underneath, but didn't penetrate to the plastic behind.
So, how will you use yours?
Tuesday, 5 February 2013
An expenses envelope for the Midori Traveler's Notebook
One of my most popular Filofax inserts was an expenses envelope that was printed on one page and folded to store business receipts. On the front was a form on which you could list expenses. I recently created an envelope to sit in a Midori Traveler's Notebook and realised that if I stuck an expenses form on the front of it, I could use it in the same way I used the Filofax expenses envelope.
So here is the form.

And here is how it looks when stuck to the front of the envelope.

You can download this form as an editable Microsoft Publisher file or as a PDF file. Either way, the file will print 3 forms per page which you can then cut out and use.
So here is the form.

And here is how it looks when stuck to the front of the envelope.

You can download this form as an editable Microsoft Publisher file or as a PDF file. Either way, the file will print 3 forms per page which you can then cut out and use.
Monday, 4 February 2013
New Filofax A5 diary layout for free download - Month Views Plus Notes
It's never too late to develop a new diary insert format is it?
We have often heard people bemoan not being able to separate month inserts so they can either archive them or interleave monthly inserts with weekly or daily inserts. So to combat this issue we have put notes pages on the reverse side of the monthly print outs.
If you don't want to interleave your monthly inserts or you don't archive them then continue to use the regular monthly inserts we have already made available.
Here's what the new Month on One Page plus notes format looks like:

You can download prepared 2013 sets in either the Month on One Page version (Word document or PDF document) or the Month on Two Page version (Word document or PDF document).
Each version is set up as an A4 document. To use them as A5 inserts, print the document in booklet mode on A4 paper, then use a guillotine to divide each sheet into two and punch the required holes, which the templates are set up with mirrored gutters to accommodate. Or, if you have A5 paper, then either the printer or the PC will scale it to size for you.
If you want to tinker, then you can download the source files. Starting with the Word files, choose between the Month on One Page version or the Month on Two Page version. With either, you'll need the Excel data file as well.
As long as you have some basic Word and Excel skills, you should be able to give this a go. You'll need to be able to set up a basic mail merge file link, and there are plenty of web tutorials that show you the way - Google using the search terms: Word Excel Mail Merge 20xx (where 'xx' is 02, 03, 07 or 10, depending on your version.)
Depending on what version of Word you're using, Word may put section breaks between every record, which will throw out the mirrored gutter formatting in the layout. If it does, the solution is quite simple; do a find and replace on section breaks (^b) to remove them all.
But if all you want to do is change a font or a font colour, you can download the prepared 2013 set and perform a format find and replace in Word. This link will show you how.
Also see the videos on the Diary Inserts page.
Additionally the Personal size on Personal Paper Month to a Page and Month View have also received the same treatment.
You can download prepared 2013 sets in either the Month on One Page version (Word document or PDF document) or the Month on Two Page version (Word document or PDF document).
For tips on printing on to Personal Size paper please see this instruction post.
As with the Personal size we are also making the source files available. Starting with the Word files, choose between the Month on One Page version or the Month on Two Page version. With either, you'll need the Excel data file as well.
We have often heard people bemoan not being able to separate month inserts so they can either archive them or interleave monthly inserts with weekly or daily inserts. So to combat this issue we have put notes pages on the reverse side of the monthly print outs.
If you don't want to interleave your monthly inserts or you don't archive them then continue to use the regular monthly inserts we have already made available.
Here's what the new Month on One Page plus notes format looks like:

You can download prepared 2013 sets in either the Month on One Page version (Word document or PDF document) or the Month on Two Page version (Word document or PDF document).

Each version is set up as an A4 document. To use them as A5 inserts, print the document in booklet mode on A4 paper, then use a guillotine to divide each sheet into two and punch the required holes, which the templates are set up with mirrored gutters to accommodate. Or, if you have A5 paper, then either the printer or the PC will scale it to size for you.
If you want to tinker, then you can download the source files. Starting with the Word files, choose between the Month on One Page version or the Month on Two Page version. With either, you'll need the Excel data file as well.
As long as you have some basic Word and Excel skills, you should be able to give this a go. You'll need to be able to set up a basic mail merge file link, and there are plenty of web tutorials that show you the way - Google using the search terms: Word Excel Mail Merge 20xx (where 'xx' is 02, 03, 07 or 10, depending on your version.)
Depending on what version of Word you're using, Word may put section breaks between every record, which will throw out the mirrored gutter formatting in the layout. If it does, the solution is quite simple; do a find and replace on section breaks (^b) to remove them all.
But if all you want to do is change a font or a font colour, you can download the prepared 2013 set and perform a format find and replace in Word. This link will show you how.
Also see the videos on the Diary Inserts page.
Additionally the Personal size on Personal Paper Month to a Page and Month View have also received the same treatment.
You can download prepared 2013 sets in either the Month on One Page version (Word document or PDF document) or the Month on Two Page version (Word document or PDF document).
For tips on printing on to Personal Size paper please see this instruction post.
As with the Personal size we are also making the source files available. Starting with the Word files, choose between the Month on One Page version or the Month on Two Page version. With either, you'll need the Excel data file as well.
Friday, 1 February 2013
How to Use a Filofax

Still reading? OK then. This post will seek to briefly answer the question of how to use a Filofax. It will not address the issue of why to use a Filofax, nor whether to use a Filofax. I'm assuming you have worked through these questions yourself.
So, how should you use it? the real - but potentially unhelpful - answer is, 'However you like.' What follows is just one possible answer. It is based on my experience of what works (for me) and what doesn't (again, for me), filtered through the sieve of my own likes and annoyances. I'll try to keep it snappy; we're all busy people.
The rules
1. Put all other notebooks, planners and pads out of reach. While you are getting your Filofax up and running (say, the first couple of weeks you spend using it) you don't want the distraction of handling multiple systems.2. Write in your diary every appointment you need to remember, including other people's insofar as they affect you. For instance, is your partner going out for the evening one day next week? That needs to be in your diary too if it means you will have to be at home providing childcare.

3. Every day, read today's diary and scan about a week ahead. Look for events that have been cancelled or are no longer relevant. Delete them. Think about any events you might need to add. Add them.
4. Maintain a separate (i.e. separate from the diary) list if you want to use your Filofax to manage tasks. The only time a task should be in your diary is if it needs to be done on a particular day. If it is just a matter of having to be done by a particular day, it belongs not in the diary but in the task list, where you should also note the deadline date. You can do this with standard Filofax task pages, but it's easier with Turbo Task pages.

5. Scan your task list at least daily for items you can or must do and mark complete.
6. Carry your Filofax with you everywhere. This is really important.
7. Whenever you set or accept an appointment or identify a task, write it down in the appropriate section straight away. Don't try to remember it to write in later. Don't write it on a scrap of paper to transfer later. Write it in the correct place in your Filofax right now. No excuses.
8. Have a notes section with plenty of blank paper. Write down anything you need to remember that isn't a diary or task entry. You can use plain paper or lined, grid, dot grid or a selection. The paper can be different colours if you like. If you must, you can decorate it.

9. Before you agree to an appointment, check your diary. You need to be able to trust what you see written there, hence the earlier warnings about writing things in right away.
10. As soon as you complete a task, mark it as complete in your tasks section and if you have time choose another to get started on.
11. These three sections - diary, tasks and notes - are the heart of your Filofax. If you want you can have other sections too, say for addresses, to track your finances or to hold long term reference information.
12. Do not stuff your Filofax with pages or accessories you will not use every day. Your system has rings. You can add things and remove them whenever you like. Have a photo or two in there if you like, by all means, but it is a personal organiser, not a scrapbook. Anything that doesn't help organise you should not be in it.
13. Use dividers to help you get to different sections quickly. Use sticky tabs to categorise sub-sections. This might be useful if you decide to keep multiple lask lists (e.g. home and office.) Have some sort of 'today' marker in your diary.

15. Keep doing all the above. Don't lapse. Keep forcing yourself until it becomes habitual. Again, no excuses.
Now what?
You can, of course, download and print most of the pages you'll need from this site. Diary inserts are here. Other inserts are here. They are free to download and free for your personal use.
So there it is. That is how to use a Filofax. Unless you want to use it differently. It's up to you. You can do what you want; I'm not your mother.
Subscribe to:
Posts (Atom)
LinkWithin2
